Materials in the editor
How to find, apply and edit materials in the editor, what Pro and Super materials add, and toon shading and stickers.Use this when: you want to change how an object looks on screen or in an exported image or video.
Don't use this for: choosing what a print is made of. Read Materials and finishes.
Editor materials set the look of your scene: color, shine, glass and texture. They do not set what a print is made of. For printing, read Materials and finishes.
Open the materials menu
- Press
M, or - click
Materialin the left toolbar, or - in the inspector, click the grid button next to the material ("Open materials panel").
The menu has a search field ("Search for materials"), a shuffle button that applies a random material, and a + button for a new material.
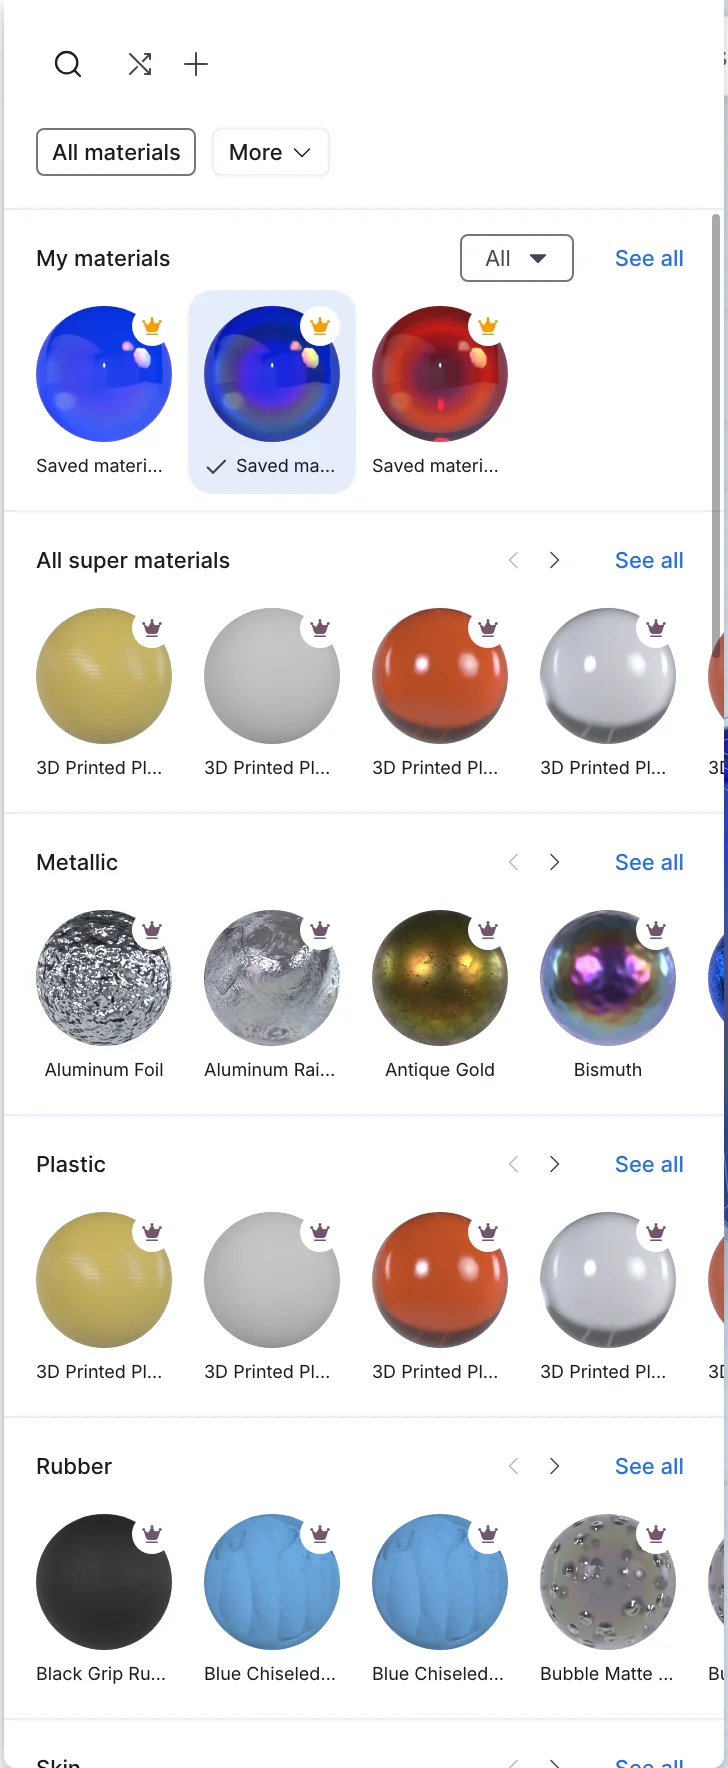
The materials menu (M). Each row has See all; Pro materials show the crown.
Categories
All materials: the whole library.Recents: materials you used recently.My materials: materials used or edited in this project. Filter them byUsedandUnused.All super materials: the Super material library.New,Metallic,Plastic,Rubber,Skin,Glass, and underMore:Wood,Stone,Cement,Food,Brick,Clay,Ground,Fabric,Interiors,DisplacementandMisc.
Apply a material
- Select an object, a union, a group or several objects.
- Click a material in the menu.
On a union or group, the material goes on every object inside it. To try random looks, use Shuffle Material in the bottom bar or in the inspector.
In the inspector, next to the material name:
- the crosshair button selects all objects with this material applied.
- the menu button lets you edit, duplicate or remove the material.
Edit a material
Click the material in the inspector to open its settings. You can rename it at the top.
Editing a material changes every object that uses it. To change only one object, click Duplicate first. The object then uses the copy.
Base settings (free)
Color, Metalness, Roughness, Glass and Translucency. Each slider runs from 0 to 100.
- Low
Roughnesswith someMetalnessgives sharp reflections. - For glass, keep
MetalnessandRoughnesslow and raiseGlass.
Pro settings
Pro materials add a Pro section. Without Pro, the section is locked: "These options are for special Pro materials just for Pro users!" With Pro, a normal material shows Duplicate with Pro to make a Pro copy.
| Setting | Also known as |
|---|---|
Surface tint & shine | Specular tint |
Inside color | Absorption |
Semi-Clear | Subsurface scattering |
Translucency Weight | |
Material Thickness | IOR (index of refraction) |
Surface shine strength | Sheen strength |
Sheen Roughness | |
Glow | Emission |
Metallic rainbow effect | Iridescence |
Rainbow glass | Dispersion |
Surface opacity | Marked experimental |
In a Pro project, the base Translucency slider is off for every material. Use Semi-Clear instead.
Super materials
A Super material is a procedural material with extra controls for its texture. There are 500+ of them, and they need Pro. The controls differ from one Super material to the next.
To make one from scratch, click + ("Create new material") in the inspector and choose New Super Material. New Pro Material makes a Pro material. Both need Pro.
You can put a Super material on a whole curve or on single curve points.
Toon shading
Toon shading gives the whole scene a flat, cartoon look. Open Functions in the left toolbar and choose Toon shading. It is marked experimental. It is in current (v2) projects only.
- Mode:
Disabled,Enabled,Flat modeorFlat mode (hard edges). Levels: 1 to 15, when the mode isEnabled. Fewer levels give fewer bands of shade.Enable outlines, then set the outlineWidth(1 to 4; fixed at 1 inFlat mode (hard edges)) andColor.
To turn the effect off, set the mode to Disabled. Closing the panel does not turn it off.
Stickers
A sticker puts an image on the surface of a model. Stickers are Pro.
- Open
Functionsin the left toolbar and chooseImport image and sticker(marked experimental). - Choose
Sticker("Import as sticker that can be applied to surfaces of objects") and pick an image. - Select the sticker. In the inspector, click
Stick to an object, then click the surface where it goes. - Set
Position,RotationandSizeto place it.Replace imageswaps the picture and keeps the placement. - Turn on
Restrict visibility to areato keep the sticker off objects in nearby areas.
The same menu has Add as reference image (a guide that is not part of the scene), Flat image (the image as a flat plane) and SVG.
To turn an image that is already in the scene into a sticker, select it, open Functions, choose Conversion and click Convert Image to Sticker. This needs a Pro project on the current (v2) engine.
You can apply materials, Super materials included, to a sticker.
Use instead
- Wrong move: editing a shared material to change one object. Why: every object with that material changes. Right move: click
Duplicate, then edit the copy. - Wrong move: picking an editor material to choose the print material. Why: editor materials only change how the scene looks. Right move: choose the print material in the print panel. See Materials and finishes.
- Wrong move: closing the Toon Shading panel to remove the effect. Why: the effect stays on. Right move: set the mode to
Disabled.
Last checked: 2026-11-10. Womp version: Womp web app, November 2026.